Senin, 18 Desember 2017

CHOCOLATE DIPPED COOKIE / CHOCLOLATE DIPPED COOKIES

These crispy and crunchy cookies are perfect for gifting or sharing during Christmas. Kids love it more as it is dipped in chocolate. I dipped half of it in chocolate as it doesn't become over sweet and chocolaty and balances the taste very well.

INGREDIENTS: 
1 cup all-purpose flour
1/2 cup butter
1/3 cup powdered sugar
1/2 tsp vanilla essence
1-2 tbsp milk

1/2 cup dark chocolate or chocolate chips
1/4 cup sprinklers

METHOD
Using beater or hand whisker beat butter, sugar and vanilla essence till white and creamy. Add flour and mix well. Add 1 tbsp milk at a time and combine all the ingredients using hand to make dough. If required add 1 more tbsp of milk to combine the dough.

Keep the dough in fridge for 20 minutes or for 15 minutes in freezer.

After 20 minutes divide dough in two equal parts. Keep one part in fridge and start working on one part.

Dust flour on working slab and roll the dough using rolling pin, it's ok if it breaks while rolling, just join it using hands.

Using cookie cutter, give desired shapes. Work with another another part of dough in same way.

Place them on baking tray and bake at 180�C in pre-heated oven for 10 minutes.

Remove from oven, let it cool down completely.

By the time it's becoming cold, using double boiler method melt chocolate.

Dip completely cooled cookie half, sprinkle sprinklers over wet chocolate and keep it for drying.

Once chocolate is set, store in air-tight jar.

Pictorial:


1. In a beater or using hand whisk, beat sugar, vanilla essence and butter till creamy.


2. It's done.


3. Add all-purpose flour.


4. Add 1 tbsp milk at a a time, if required add more milk but little by little.


5. Wrap in cling film and keep in fridge for 20 minutes or 15 minutes in freezer.


6. Divide dough in 2 equal parts. Keep one part back in fridge.


7. Dust the working slab with flour, roll the dough using rolling pin.


8. Cut in desired shape using cookie cutters.


9. Like this.


9. Place butter paper on baking tray, keep cookies.


10. Bake in pre-heated oven at 180�C for 10 minutes or till it become little brown. Let it cool down completely.


11.  Melt dark chocolate using double boiler method.


12. Dip cooled cookies halfway.


13. Sprinkle sprinklers when chocolate is wet.


14. Enjoy!


15. Closer look!

Senin, 11 Desember 2017

OATS PANCAKE / OATS CHILA

Oats pancake is made with 100% oats. It is very healthy and delicious breakfast option. Though its very easy to prepare, the most tricky part of this recipe is cooking it. 

You need to keep few tips in mind while making this, it needs to be cooked on medium flame not on low flame and other thing is to flip it fast to avoid breakage.

If you keep these simple things in mind you will end up this yummy and healthy breakfast. You can even pack it in kids tiffin box.


 INGREDIENTS
1 cup oats
1 1/2 cup water
1 chopped onion
1/2 inch finely chopped ginger
2-3 pods finely chopped garlic (optional)

1/2 tsp turmeric powder (haldi powder)
salt and green chili to taste (I didn't add chili due to kids)
handful freshly chopped coriander leaves
oil for cooking pancake

METHOD
1. In a large bowl add oats, onion, ginger-garlic, turmeric powder, coriander leaves, salt and green chili.

2. Mix well, add water.

3. Keep this batter aside for 30-45 minutes.

4. After 30 minutes, mix well.

5. Heat pan, spread oil and pour ladle full of batter and spread it with very light hand, don't be rough.

6. Keep flame medium and cook till it turns brown, and flip only once that side is cooked.Don't be in hurry to flip, before flipping make sure the side is cooked well or it will result in broken pancakes.

7. Be quick in flipping, this is the most tricky part, even if it breaks while flipping, don't worry keep cooking, you might not get perfect shape still you will have tasty chila.

8. Enjoy with coconut chutney.

NOTES:
1. Oats are not required to be roasted here.
2. You can add tomatoes, roasted urad dal, chana dal for extra flavor. 
3. Using non-stick pan is advisable for best result.
4. Keep flame medium not low.
5. The only challenge while making these pancakes is filliping them. For best results, keep flame medium not low, flip only when it's cooked and brown from one side and be quick in flipping.


Pictorial:


1. Mix all the dry ingredients.


2. Add water.


3. Keep batter aside for 30 minutes.


4. Batter after 30 minutes.


5. Brush oil over non-stick pan, around 2-3 tbsp. Pour full of batter. cook on medium flame.

6. Flip only when it is brown.


Minggu, 10 Desember 2017

PANEER MAKHANI / INSTANT BUTTER PANEER

Paneer Makhani or instant butter paneer is one of the quickest and buttery way of making paneer, specially when you have guests coming at very short notice, this recipe comes very handy and leaves a great impression on guests. 
Best part of this recipe is that it requires very less time and less ingredients unlike shahi paneer. 

I have posted authentic recipe of making shahi paneer, but it requires many ingredients and takes time too, but it's all worth it. 

Serves: 7-8 bowls 

 INGREDIENTS 
1/2 kg Paneer
2 medium sized roughly chopped onions
4-5 large roughly chopped tomatoes
8-9 cashew-nuts  (Kaju)
2 bay leaves (tej pata)
2-3 cloves
1 black cardamom (badi elachi)
1/2 inch cinnamon stick
1 tsp deegi mirch powder (red chili powder)

5-6 garlic pods
1/2 inch ginger
1/4 cup butter
1/4 cup fresh cream (I used Amul fresh cream)
1 tsp honey
1 tsp kasuri meethi
salt to taste

METHOD
1. In large deep pan, add onion, tomatoes, garlic, ginger, cashews, bay leaves, cardamom, cinnamon stick, 2 tbsp butter (out of 1/4 cup) and 1/2 tsp chili powder out of 1 tsp. Add water 2 glasses of water, cover and cook on medium to low flame till water is absorbed.

2. Once onions and tomatoes are cooked, turn off the gas, let it come down to room temperature.

3. Transfer all the ingredients except bay leaf and cardamom. Make a fine paste.

4. In same pan, add remaining butter and remaining chili powder.

5. Add gravy, cook for 2-3 minutes.

6. Add paneer cubes. Mix well.

7. Add honey, salt and kasuri meethi,  give a good stir.

8. Cook for 2-3 minutes. Turn off the gas and add cream.

9. Serve hot with tandoori roti or tandoori parantha.

Pictorial:


1. In deep pan, add onion, tomato, ginger, garlic, cashew, bay leaf, cinnamon stick, cloves, cardamom, chili powder, butter with water.


2. Close the lid and cook on low to medium flame.


3. Once water is dried.


4. Except for bay leaf and cardamom.


5. Transfer rest in blender jar.


6. Pulse to make fine paste.


7. Using same pan, add remaining butter.


8. Add chili powder.


9. Add gravy, cook for 2-3 minutes, add paneer.


10. Mix well.


11. Salt.


12. Honey.


13. Roasted and crushed kasuri meethi.


14. Mix well, add cream.


15. Garnish with freshly chopped coriander leaves and serve hot!


SOME SUCCESS STORIES: 


1. By Sabita Kathuria.


Selasa, 05 Desember 2017

APRICOT JAM / KHUBANI KA MEETHA

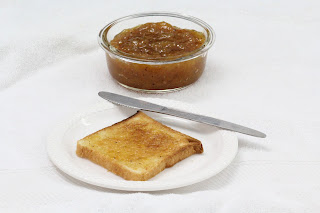
Making jams at home is a wonderful way to preserve fresh taste that can be enjoyed during any season. Apricot is one of those fruits. You can use fresh apricot to make this jam or dried apricot can be used too. Here I used dried apricot . 

It can be used as jam spread on breads or use as topping over plain custard. My kids like it more as topping on custard as it balances the taste very well.

 
INGREDIENTS 
250 gm dried apricot (Khubani)
3 cups water
1/2 tsp cardamom powder
1/2 tsp cinnamon powder
1 cup sugar
1/4 cup honey

METHOD
1. Soak apricot in 3 cups of water and keep overnight.

2. Discard seeds from it by gently pressing the apricot. Store water for later use.

3. You can break the seeds and enjoy the nut inside. The nut tastes really good and great for health.
n,
4. Transfer apricot in pan, add sugar, honey, cinnamon and cardamom. Let it cook for first 5 minutes on low flame and then as soon as sugar melts increase the flame to medium to high.


5. Once you see nice caramelized color add leftover apricot water.

6. Mix well, cover and cook for 2-3 minutes.

7. After 5 minutes, open the lid, if you see scum on the edges, discard with the help of spoon. Now cook on high to medium flame and mash it using potato masher or you can use ladle. I like to keep it roughly mashed as it tastes much better than puree. (It's a personal choice and taste, you can blend in mixer and make a puree if wish so).

8. Cook till it become little thick.

9 Don't let it become too thick as after cooling down it becomes more thick.

10. Once it cool down completely, transfer in glass jar and refrigerate.

11. Enjoy as topping on custard, cakes or spread on bread as jam.

12. This can be stored upto one month in fridge.

Pictorial:


1. Wash and soak apricot overnight.


2. Remove seeds from soaked apricot and keep water aside.


3. Transfer de-seeded apricot in deep pan . Add sugar.


4. Add honey.


5. Cardamom powder.


6. Cinnamon powder.


7. Cook on low to medium flame till sugar caramelize.


8. Once sugar caramelize add leftover apricot water.


9. Mix well.


10. Cover and cook for 2-3 minutes.


11. Open the lid, if you see scum on the edges.


12. Remove with the help of spoon.


13. Using potato masher, make a rough paste.


14. Once it thicken little bit turn off the flame.


15. Once it cool down, transfer in clean sterilized glass jar. Store in fridge or freezer up to one month.


16. Spread on bread and enjoy as jam.


17. Or spread as topping on plain custard.